2.5D Scenes & Backgrounds
2.5D is not a special rendering mode — it's a family of old, well-proven tricks for faking depth cheaply. This guide walks end-to-end through building a 2.5D scene with Small World: matching a background image to a camera, defining where a character is allowed to walk, choosing the right camera strategy, scenes with more than one vanishing point, and a handful of real bugs this engine's own reference game ("The Whisper") ran into along the way.
Related: The basic mechanics of background planes — UVs,
flipY, aspect ratio — are covered in 2.5D Backgrounds & Texture Orientation in the coordinate system guide. This guide builds on that with perspective matching, movement zones, and camera-strategy trade-offs. For every class and option mentioned below, see the API reference. For an illustrated fundamentals explainer ("how 2.5D works"), see.agents/notes/reference/2-5d-grundlagen.htmlin the repo.
1. What "2.5D" actually means
Pure 2D: everything is a flat sprite, the camera is irrelevant, there is no depth. Pure 3D: everything is real geometry, and the camera can go (almost) anywhere. 2.5D sits in between — real 3D objects (usually just the player character) exist, while the world around them, the camera, or both are deliberately constrained, so the result reads like a flat, composed image rather than a free 3D space.
"The Whisper"'s own design document names this already, without calling it "2.5D": the "Viennese peepshow-box principle" — the outside world shown in isometric top-down view, interiors as a side-cut theater set. That's exactly this family of tricks, just with a Viennese name for it.
2. Three ways to fake depth
None of these techniques move much real 3D geometry — each one "claims" depth while actually doing as little of it as possible.
2.1 Parallax layers
Several flat image layers, stacked one behind another. When the camera pans sideways, nearer layers scroll faster than farther ones — the eye reads depth purely from the difference in speed, even though every single layer is completely flat.
- Examples: classic 2D platformers (Super Mario World), most modern indie platformers.
- Pros: cheapest option, barely any computational cost; very predictable, no camera surprises.
- Cons: the character can't really "walk into the scene"; only lateral movement works, no real depth.
2.2 Pre-rendered background + 3D character
A fixed, painted or pre-rendered background image, with exactly one real 3D object — the player character — moving over it. This is exactly the flakturm-tunnel scene: BACKGROUND_Z never changes, the camera never moves. The background carries the entire stage set; the engine only has to compute a single real 3D thing.
- Examples: Grim Fandango, Broken Sword, the early Resident Evil games.
- Pros: the background can be as elaborate/painted as desired — costs nothing at runtime; very controlled, cinematic image composition.
- Cons: the camera can never dodge geometric edge cases like self-occlusion (§7); the art's perspective and the 3D camera's perspective must match exactly (§3).
2.3 Forced perspective via scaling
Instead of actually moving a character deeper into a 3D volume, it's simply scaled smaller as it "recedes" — world Z stays nearly constant while the apparent size shrinks. That's exactly what StageZone does: each zone point carries its own scale value (1.0 at the bottom of a staircase, 0.5 further up, 0.3 deep in a tunnel), linearly interpolated between points.
- Examples: a classic adventure-game trick, already used in point-and-click games of the 90s.
- Pros: a single tunable number per zone point; works even where the camera never really looks.
- Cons: needs carefully chosen values — too large a jump between points reads as a bug, too small is imperceptible; it remains an illusion, never real depth movement.
The diorama scene uses none of this. Its camera is free to orbit a real 3D stage (
OrbitController). Both approaches exist side by side in the same project, for different purposes: a showcase presentation vs. a controllable game scene.
3. Setting up a background image: perspective & the vanishing point
Before a single zone is drawn, the image itself has to match the 3D camera. This is the step most easily skipped.
The order that actually works
- Fix the camera first — position, look direction, field of view (FOV). In
flakturm-tunnel:camera.position.set(0, 4.5, 10.864), target(0, 4.5, 0), default FOV 75°. The camera looks exactly straight ahead, no lateral tilt. - Derive the image's aspect ratio from that, not the other way around.
BACKGROUND_WIDTH = 16,BACKGROUND_HEIGHT = 9— the image is mapped 1:1 onto a plane of exactly this size, no cropping or stretching needed if the ratio is right from the start. - Only now paint or generate the art — with the camera position and view depth already known. Painting first and fitting a camera to it afterward means solving the problem backward; it can work, but it's needlessly error-prone.
Where the vanishing point has to sit
For a straight, symmetric camera like this one (camera X = target X, camera Y = target Y, only Z differs), there is exactly one vanishing point — and it has to sit exactly where the camera's optical axis pierces the image plane. For a centered view, that's simply the image center. Any line in the image that "recedes into depth" (a tunnel tube, a row of rooms, rails) must converge there — otherwise a 3D character placed in this scene will visibly fight a perspective that doesn't match its own.
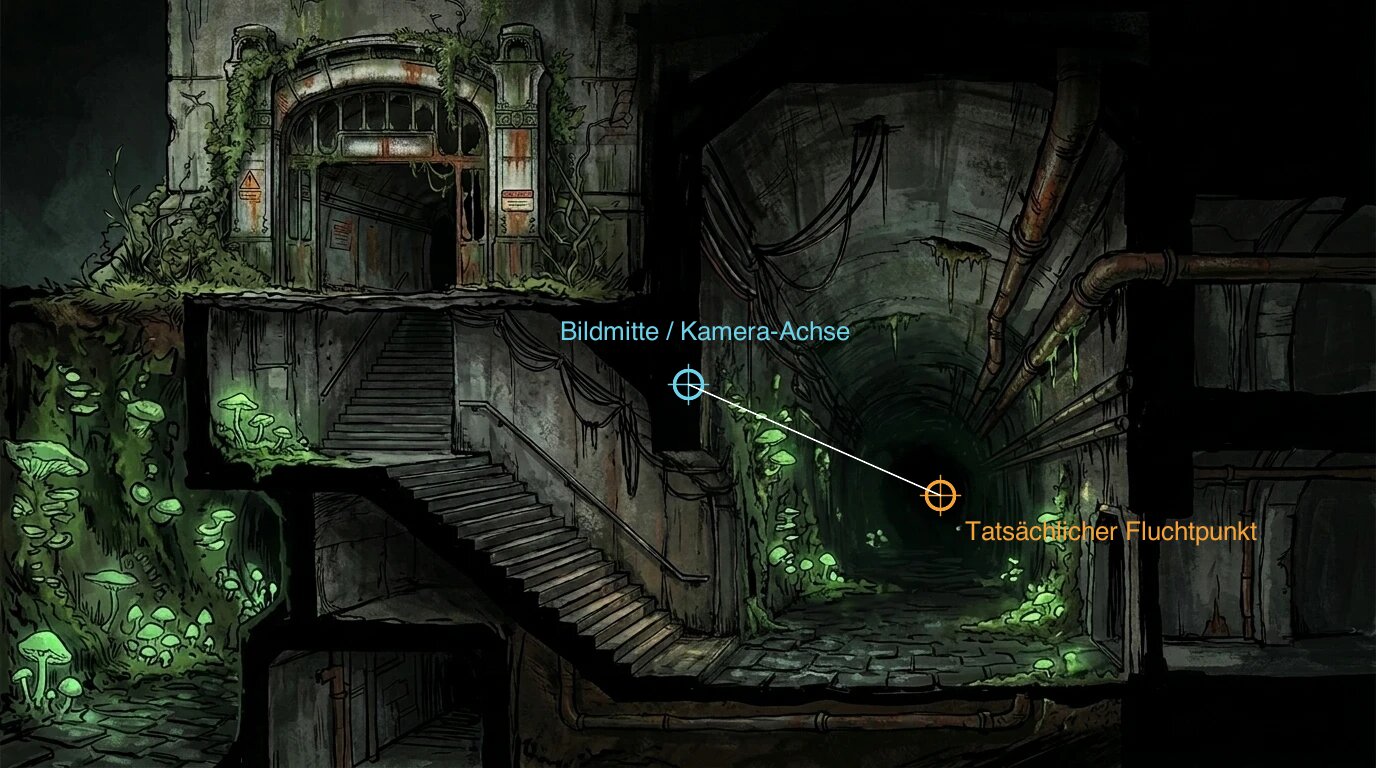
A real example from this project, not staged: blue marks the actual image center — exactly where the fixed 3D camera looks straight ahead. Orange marks where the painted tunnel itself visually converges. The two are noticeably apart. This doesn't have to break anything (the eye is forgiving, and this camera never moves), but it's exactly the kind of detail worth checking deliberately instead of leaving to chance.
How to check it yourself: extend two or three clearly straight lines in the image (a wall edge, a pipe run, the edge of a corridor) and see where they actually meet. If that point doesn't sit where the camera axis points according to the code, at least you know it — and can decide whether it matters for this particular image.
What about field of view (FOV)? It determines how strongly receding lines converge toward the center — a small FOV (telephoto) compresses barely at all, a large FOV (wide-angle) pulls the edges outward noticeably. If the art was painted or generated assuming a different focal length than the one the 3D camera actually uses later, the real 3D character will end up looking too flat or too stretched compared to the painted world around it. Easiest to test with a single placeholder object at a known position before the final art exists — not after.
When does this actually matter?
Perspective matching is only a concern when a real 3D camera renders both a flat, painted/pre-rendered image and real 3D geometry (the character) together and expects them to read as a single, consistent shot. Specifically, in this engine:
- Matters —
FIXEDstrategy. Camera position/look/FOV are set once, so the art can be matched to it exactly once and stays valid forever. This is theflakturm-tunnelcase. - Doesn't matter —
ISOMETRICstrategy. Orthographic projection has no vanishing point, by construction: parallel lines stay parallel, they never converge. The whole question doesn't arise. - Doesn't matter — free/moving cameras that only render real geometry (e.g. the diorama's
OrbitController). There is no painted element that would need to match a specific camera position.
It's also not a purely cosmetic concern. The scale value at each StageZone point is really a hand-estimated stand-in for "how deep in the image does this point sit". Knowing the real vanishing point (and the horizon line, §4) means this falloff could in principle be computed instead of guessed — and, crucially, multiple zones (or later hotspots, NPC spawn points, object placement) could all be anchored to the same, consistent rule instead of each carrying its own, independently estimated curve. This becomes concretely necessary as soon as a background has more than one receding direction — see the next section.
4. More than one vanishing point: street corners & branching backgrounds
A single, straight corridor (like the tunnel above) always needs only one vanishing point. As soon as a background shows a branch — a street continuing straight ahead, and, say, a doorway or archway branching off at an angle — the image correctly contains two vanishing points at once. This isn't a bug or a perspective problem; that's simply how two-point perspective always works, and it shows up constantly in hand-painted adventure-game backgrounds at street corners (a Paris street corner in Broken Sword is a well-known example of this kind: a boulevard receding straight ahead, and an archway leading off sideways at a different angle — two independently converging line families in a single image).
Why two vanishing points are correct, not a bug
A row of parallel lines running straight away from the viewer converges to exactly one vanishing point — that's the single-point case from §3 (a tunnel or corridor, viewed head-on). As soon as a second, differently oriented row of parallel lines exists in the same image — a side street at an angle, a building facade rotated relative to the main street — that row converges to its own, separate vanishing point. As long as both line rows are level (parallel to the ground plane, no camera tilt), both vanishing points lie on the same horizon line — the line at the artist's/camera's eye level.
                       Horizon line (eye level) -- both vanishing points sit here
      VP-A  · · · · · · · · · · · · · · · · · · · · · · · · · · · · · ·  VP-B
        \                                                           /
         \    Corridor A                       Corridor B          /
          \   (straight ahead)              (archway, angled)     /
           \                                                     /
            \                                                   /
             \________________________●________________________/
                              Street corner
                        (character stands here)
Three consequences of this carry directly over to the tools this guide has already covered:
- One
StageZonechain per branch, not one global falloff. A single scale interpolation only makes sense along a single receding direction. At a branch point, each corridor needs its own separate zone chain, each with its ownscaleprogression, tied to its own vanishing point — the zone-authoring workflow from §5 applies per branch, independently of each other. - Edge matching at shared boundaries still applies, just per branch. The rule "match two zones at a shared edge" from §5 (matching
(u,v)values exactly at the seam) applies at the corner tile itself — both corridor zone chains must line up exactly in position and scale where a player can cross from one into the other. - Facing direction has to change at the branch, not just position/scale. Walking from one corridor into the other means the character's facing has to realign to the new corridor's own receding direction — the same mechanism as
StageMovementBehavior'sfacingOffset/startFacingNudgeoptions (§7), just applied at a branch transition instead of at scene start.
The general rule: every zone is two vanishing-line pairs, not "2 horizontal + 2 lines"
"2 horizontal + 2 vanishing lines" (§3) is itself only a special case. What actually holds for any flat rectangle under a roll-free camera: it has two pairs of parallel edges, and each pair converges to its own vanishing point. One pair only comes out as pure, non-converging horizontal lines if that pair happens to be frontal — exactly perpendicular to the camera's look axis. That's true for a corridor receding straight along the camera's own Z axis (the tunnel), but nothing guarantees that for a walkable area branching off at an angle.
A staircase leading away diagonally rather than straight back is exactly this case. Neither of its two edge pairs is frontal anymore, so neither has to be horizontal — both pairs are vanishing lines, just toward two different points (and since the staircase also rises, at least one of those points sits off the main horizon, not on it). Concretely, in Zone C of flakturm-tunnel (the staircase branching off from the forecourt at an angle instead of receding straight ahead like the tunnel): both its "across the stairs" edge pair and its "along the stairs" edge pair are non-horizontal vanishing lines, each converging to its own point — that's expected, not a red flag. It's the same "own vanishing point per branch" rule from above, just visible directly in the shape of the zone polygon instead of only in the painted art.
How to tell whether a zone's edges are actually correct, not just self-consistent: extend each of its two edge pairs into full lines, past the polygon's own corners, and check whether each pair converges to a sensible point. Two points can be perfectly consistent with each other and still both be wrong compared to the art — the only way to catch that is to compare the extended edge directly against the painted line it's supposed to follow, exactly like §3's vanishing-point check works, just applied per zone edge instead of once for the whole background. See §5's zone-authoring steps for exactly this check, including a real example of how it caught a mis-traced edge in this project.
A quick sanity check for horizon consistency
If two different converging line families in the same image lead to vanishing points that don't lie on the same horizontal line, one of two things is true: either the artist didn't work with a single, consistent eye-level system (common, and not "wrong" in hand-painted art — nobody is obligated to draw technically perfect two-point perspective), or one of the depicted ground planes is actually tilted relative to the other (a sloped street, a ramp). Good to know when reverse-engineering a background image to match a real camera, rather than assuming every backdrop is geometrically consistent by default.
A third vanishing point (three-point perspective) only appears with strong up/down camera tilt — for instance, looking steeply up at a tower. Not relevant for a level, eye-height 2.5D camera like the ones used in this project so far, but good to know the name in case a future scene ever tilts the camera.
Practical steps for painting or generating such a background
- Decide how many distinct movement directions the scene actually needs — two or three is usually plenty; more becomes hard for the player to read.
- For each direction, fix its own vanishing-point position (on a shared horizon line, if a level world is desired), before the art exists — the same "camera/plan first, then paint" order as in §3, just repeated once per branch.
- Paint or generate the art with these directions in mind (separate prompts/layers per direction if needed, then composited).
- Build one
StageZonechain per direction, joined at the branch point per the edge-matching rule from §5. - Walk through the branch itself and check whether the facing/rotation change feels convincing — this is exactly where
facingOffsetpays off.
5. Defining movement areas
The basic question of every 2.5D scene: exactly where is the character allowed to go? A painted image has no built-in collision geometry — it has to be added by hand. Three common solutions:
| Approach | Description | Example |
|---|---|---|
| Walk mask (bitmap) | A second, invisible black-and-white image — white = walkable. Very old, very simple, but pixel-accurate and tedious to maintain. | classic LucasArts adventures |
| Navmesh (3D) | A triangle mesh over real 3D geometry, usually baked automatically from level geometry. The standard in real 3D games. | practically every modern 3D game |
| Normalized polygon zones | A handful of (u, v) points, drawn directly on the image, draggable in an editor. Lightweight, artist-friendly, no bitmap needed. | Small World's own StageZone system |
Small World uses the third approach. In flakturm-tunnel/showcase.ts: DEFAULT_ZONE_POINTS, three named zones (zone_a / zone_b / zone_c), each a polygon of four (u, v) points with its own scale value. StageMovementBehavior._resolveMove() checks on every move whether the new position is still inside a polygon, and otherwise clamps it to the nearest valid edge — that's the entire "collision" model. The built-in editor (key [E]) lets you drag these points directly with the mouse on the image, instead of typing coordinates.
Setting up a zone in practice
- Find the ground line in the image. Not the walls or ceiling — the surface feet would stand on. In the tunnel background: the cobblestones, not the tunnel vault above.
- Open the editor (
[E]), place four corner points roughly on that surface. Easiest to start at the nearest edge (bottom of the image, where the character spawns) and work backward from there. - Drag each point individually onto the painted edge, not "roughly" placed — a point that sticks 2% past the painted wall becomes immediately obvious later, because the character visually walks through the wall.
- Set
scaleper point, matching the painted size at that spot (1.0in close-up, noticeably smaller at a visibly farther-away pinch point — test it, don't guess). - Join two zones at a shared edge by giving the seam points nearly identical
(u, v)values — otherwise there's a visible jump in position or size at the zone boundary. - Actually walk through and look, not just eyeball the polygons in the editor — whether a zone "feels right" only shows once the character moves through it, not from the outline alone.
- Extend both edge pairs and check them against the art, per the general rule from §4. A zone can be perfectly self-consistent (its own four points form a clean quad) and still be traced in the wrong place in the actual painting — the only way to catch that is a direct comparison with the art, not just with the zone's own shape.
A real example of how step 7 caught a bug
Zone C of flakturm-tunnel (the staircase) branches off diagonally from the forecourt — exactly the rotated-rectangle case from §4, where no edge pair is horizontal. Its two edges were checked against the actually painted staircase by tracing the real step edges directly in the background art and comparing them to the zone's own corner points:
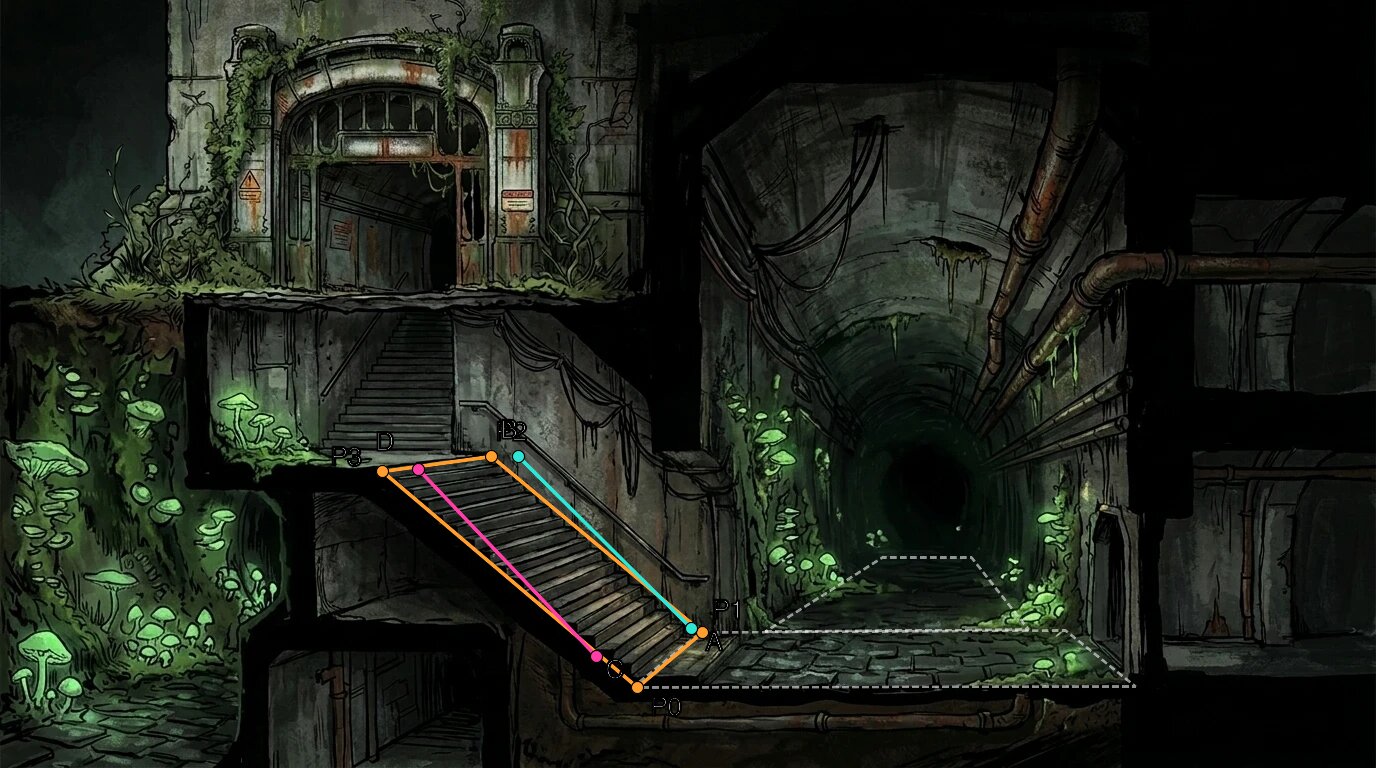
The right edge (P1 → P2, matching the measured points A/B) sat almost exactly on the real edge on the handrail side — no problem there. The left edge (P0 → P3) did not: extended against the real step edge (points C/D), it showed that the far corner, P3, reached noticeably past the painted steps, out into the dark shadow beside them.
The fix was a single-point correction, not a redrawing of the whole zone — only the actually wrong corner was moved (u: 0.278 → u: 0.305, v unchanged), P0/P1/P2 were left untouched, since they were already correct:
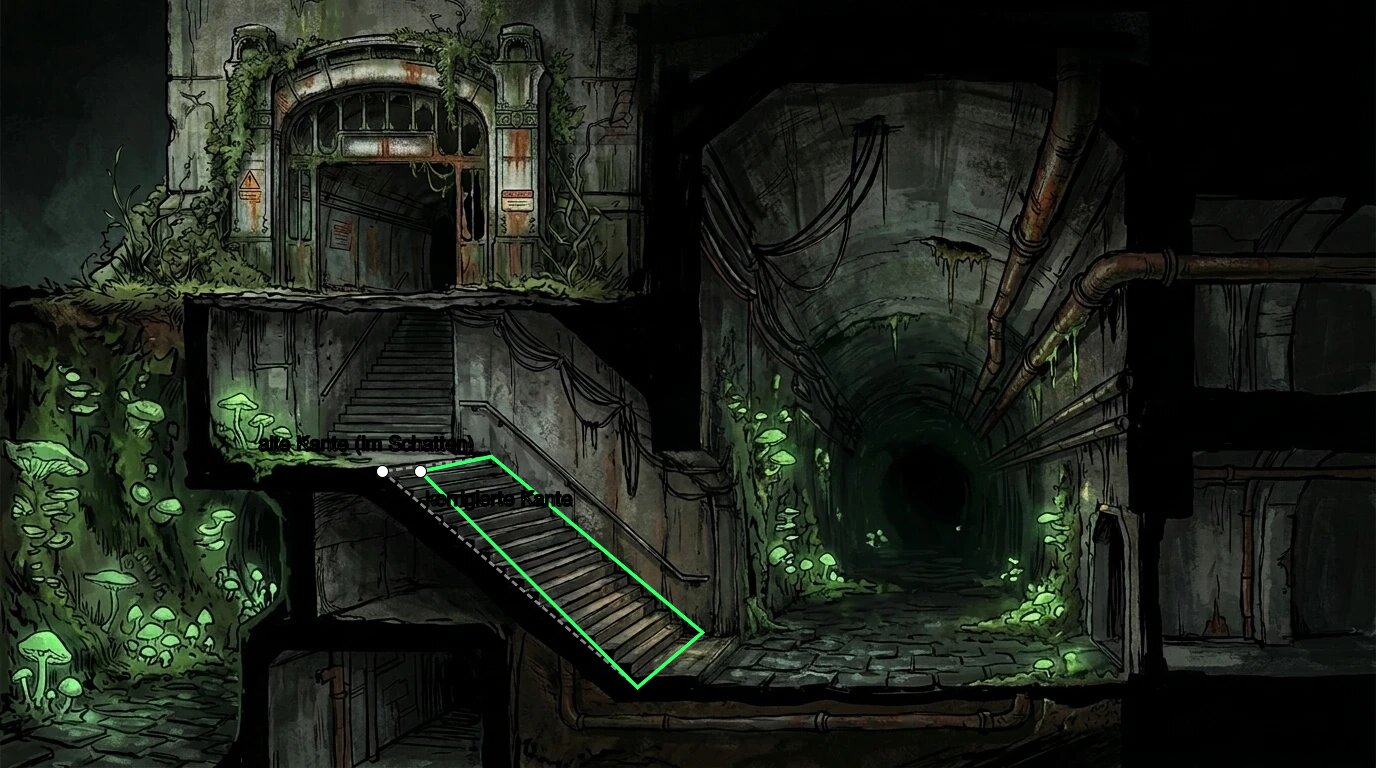
The same technique as the vanishing-point photo from §3 — direct measurement against the art, not by eye — just applied to a single zone edge instead of once for the whole background.
6. Available camera strategies
The engine ships seven ready-made camera strategies — each a recognizable pattern from real games, just under its own name:
| Strategy | Behavior | Typical use | Trade-off |
|---|---|---|---|
FIXED | Stays put, always looks at a target. | classic adventures, fixed camera rooms (early Resident Evil) | + fully controlled shot / − can't dodge problem angles |
HYBRID_SYNC | Orbits a target on a sphere, mouse drag/zoom. | product configurators, showroom/"model viewer" | + player can dodge problem angles themselves / − no composed camera shot |
STIFF | Follows the character immediately, no lag — hard and direct. | retro-style third-person cameras, arcade titles | + precise, no delay / − can feel jerky |
SMOOTH | Follows the character, but damped/settled. | most modern third-person games | + feels soft/organic / − lags behind on sharp turns |
ISOMETRIC | Orthographic, fixed angle, no vanishing point, no "closer = bigger". | Disco Elysium, Divinity: Original Sin, classic CRPGs | + readable, consistent size / − can feel technical/cold |
FPS | Sits in the character's head, rotates with their look direction. | first-person shooters, first-person exploration games | + maximally immersive / − the character itself stays invisible |
MANUAL | The engine does nothing automatically — full manual control, e.g. for cutscenes. | camera moves, cutscenes | + total control / − every movement hand-built |
Note that only FIXED (and, for a single static shot, any strategy currently parked the same way) has a real "must match the painted background" obligation as described in §3 — see the "when does this actually matter" note there for why the other six mostly sidestep this whole question.
7. Self-occlusion at a fixed camera angle
A real, reproducible geometric effect showed up while building flakturm-tunnel: at certain viewing angles, one of the character's two feet would visually disappear behind the other — no broken rig, no missing mesh, pure perspective.
The intuition: picture two fence posts in a row. Walk past them from the side, and both are clearly separate. Stand at one end of the row and look straight down it, and the far post nearly vanishes behind the near one — not because it's gone, but because your line of sight and the row of posts now exactly coincide.
The same thing happens with a character's two feet. They don't stand exactly side by side — one is slightly forward of the other (a small lateral offset plus a larger front-back offset, matching how an idle/standing pose is actually rigged). As the character rotates, the imaginary line between the two feet rotates with it. The moment that line points exactly at a fixed camera, one foot falls almost entirely behind the other on screen. The same applies to any other slightly offset detail on the body (a hand, a coat fold, the lantern's grip) — feet are simply the most noticeable case because they're set furthest apart.
Two things were ruled out during the investigation, and it's worth naming them explicitly since they're the most obvious first guesses:
- Not frustum culling. Toggling frustum culling on and off permanently made no difference — both feet stayed inside the view frustum the whole time.
- Not occlusion culling. The engine's HZB occlusion-culling pass (
config.enableOcclusionCulling) was checked directly; disabling it also changed nothing.
It's pure projection geometry: for a camera that can never move away from the critical viewing axis, this angle is guaranteed to occur at some point during normal rotation — not a rare edge case. A freely orbiting camera (HYBRID_SYNC/OrbitController, as in the diorama scene) makes the same geometry practically avoidable, because the player can simply pan away from the critical angle; a permanently FIXED camera cannot.
The fix was not "fix the leg". There's nothing broken to fix on the character — the skeleton is correct. Instead, StageMovementBehavior got a startFacingNudge option: a small angular offset (0.14 rad, ≈ 8°), applied to the character's initial facing direction, just enough that the scene doesn't start the character standing exactly on the critical line.
const movement = new StageMovementBehavior({
  input: this.input,
  speed: 0.09,
  zones: [zoneA],
  startFacingNudge: 0.14, // ~8 degrees, steers the starting facing away from the self-occlusion axis
  uvToWorld: (u, v) => ({ x: (u - 0.5) * 16, y: 4.5 + (0.5 - v) * 9, z: 0 }),
});
8. A minimal reference implementation
No magic — the entire movement system of flakturm-tunnel is five building blocks, all of which already exist in the engine. This is a sketch, not a copy-paste template:
// 1. Position the camera once, never touch it again
this.camera.position.set(0, 4.5, 10.864);
this.camera.target.set(0, 4.5, 0);

// 2. Painted background as a flat, unlit plane
const bg = new Plane({ width: 16, height: 9 });
bg.material = new BasicMaterial({ diffuseMap: await new Texture().load("bg.webp") });

// 3. Walkable area as a polygon in image coordinates (u,v 0..1)
const zoneA = new StageZone({
  id: "zone_a",
  points: [
    { u: 0.46, v: 0.90, scale: 1.0 },
    { u: 0.83, v: 0.89, scale: 1.0 },
    { u: 0.77, v: 0.82, scale: 1.0 },
    { u: 0.51, v: 0.82, scale: 1.0 },
  ],
});

// 4. Movement: normalized zones + keyboard input, no real collision world needed
const movement = new StageMovementBehavior({
  input: this.input,
  speed: 0.09,
  zones: [zoneA],
  uvToWorld: (u, v) => ({ x: (u - 0.5) * 16, y: 4.5 + (0.5 - v) * 9, z: 0 }),
});
playerRig.addBehavior(movement);

// 5. The character itself needs a light-responsive material; the background doesn't
character.material = new StandardMaterial({ diffuseMap: charTexture, roughness: 0.92 });
That's essentially the whole thing — everything else (animation, props like a hand-carried lantern, the in-scene zone editor) builds on this. Understanding these five groups of lines means understanding the entire movement system of flakturm-tunnel.
9. Lessons from building "The Whisper"
No theory — what actually went wrong while building this scene, recorded here as rules of thumb:
- Fixed camera: a camera that never moves makes every geometric edge case (self-occlusion, a branch right in front of the character) guaranteed reproducible instead of rare — plan the character's starting facing deliberately, not randomly (§7).
- Scale as depth: forced perspective needs values chosen just as carefully as real lighting — too aggressive a
scalejump between two zone points reads as a bug, not as depth. - Painted vs. lit: a painted background doesn't need 3D lighting (
BasicMaterialis correct there) — but the 3D character in front of it does (StandardMaterial). Setting both to "unlit" because it looks simpler makes the character look invisibly flat. - Movement speed ≠ animation speed: how fast a character crosses the stage and how fast its animation clip plays are two completely separate numbers — fixing a walk speed never fixes an animation clip that's too short for it.
10. Further reading
Games where the three depth tricks from §2 can be seen clearly in action:
| Game | Technique |
|---|---|
| Grim Fandango | pre-rendered background + 3D character |
| Broken Sword | pre-rendered background + 3D character |
| Little Nightmares | real 3D, heavily constrained camera |
| Disco Elysium | isometric, painted look |
| Trine | side-on 2.5D, real depth usable |
| Ori and the Blind Forest | parallax layers |
Outlook: setting up a background image together with its movement zones today means hand-editing scene code and using the
[E]zone editor per showcase. Extending the Maker editor (currently a 3D world editor, see Maker (3D world editor)) with its own 2.5D scene-authoring mode — importing a background image, checking it against the camera's vanishing point, drawingStageZonechains including branches as in §4 — is a planned direction for this, but not yet implemented.